
Hi, i'm Abhijeet - a full-stack software developer who loves building things and learning new tech along the way.
A few days back, I came across an opportunity that I genuinely didn’t want to miss just because I didn’t know Playwright. The problem? I had never really worked with it before, and honestly, it sounded a bit scary at first 😅
So I made a simple decision:
Spend 10 hours learning Playwright with zero excuses.
Surprisingly, it took me around 6 hours to understand the fundamentals, workflow, and how things actually work behind the scenes.
And trust me, those 6 hours were messy 👾
I jumped between the official docs, YouTube tutorials, random errors, and yes… asked ChatGPT some very dumb questions too.
So in this blog, I’m going to share everything I learned in those 6 hours — in a simple 6-minute read for you 🚀
By the end of this blog, you’ll be able to:
Set up Playwright
Run your first test
Record test scripts
Understand locators and assertions
Debug tests properly
Build a small real-world testing workflow
So let’s get started 👨💻
What is Playwright.
Before understanding what Playwright actually is, just think about how you normally interact with a website.
Let’s say you want to buy something from Amazon. What do you usually do?
Login → search for the item → click the product → add to cart → place the order → make payment → checkout.
That entire process is called a user flow.
With Playwright, we can automate this entire user flow and test whether the app is working correctly or breaking somewhere after new updates.
Now imagine manually testing this same flow again and again after every small update in the app 💀 Sounds painful, right?
This is exactly where Playwright comes in.👾
Playwright is an end-to-end testing and browser automation framework built by Microsoft that helps developers automate real user interactions inside the browser.
In simple words, Playwright can automatically do the same things a real user would do:
click buttons
fill forms
search items
navigate pages
verify results
and test complete workflows automatically
And the best part? It works across multiple browsers like Chrome, Firefox, and Safari using a single framework.
Installation & SetUp
Installing Playwright is honestly super easy. You just need a Node.js environment and a few commands.
First, create a new project folder and open it inside VS Code.
Then initialize your project:
npm init -y
Now install Playwright:
npm init playwright@latest
Once you run this command, Playwright will start asking you a few setup questions like:
Which language do you want to use? (JavaScript / TypeScript)
Where should test files be stored?
Do you want GitHub Actions setup?
Do you want to install Playwright browsers?
After setup, Playwright automatically creates a proper folder structure for you 🪄
You’ll notice files like:
tests/
playwright.config.js
package.json
It also installs browser binaries for:
Chrome/Chromium 🌐
Firefox 🦊
WebKit (Safari engine) 🧭
With one setup, you can test across multiple browsers automatically 🚀
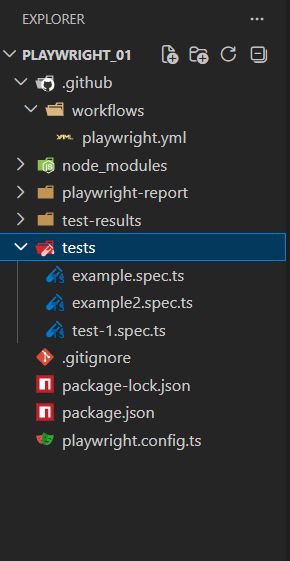
Try to read and understand the playwright.config.js file carefully 👀
That file is basically the heart of your Playwright setup.
From there, you can control things like:
which browser to run tests on 🌐
headless or UI mode 👨💻
test timeout ⏱️
screenshots & videos 📸
base URL
parallel testing
retries and much more
At first it may look confusing, but trust me, understanding this one file will make Playwright way easier later on 🚀
Your First Test
When you install Playwright, it automatically gives you an example test file so you can understand how things actually work.
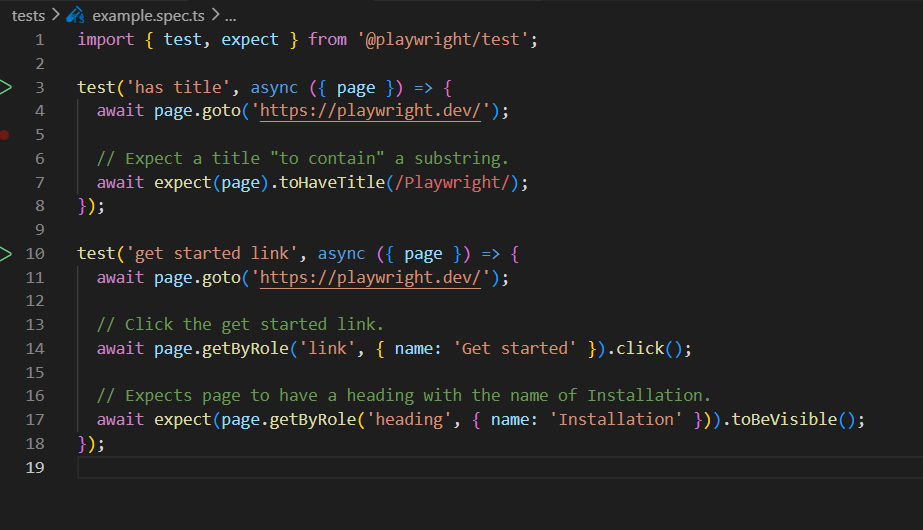
At first, this code may look scary 😵💫
But trust me, it’s much simpler than it looks.
So let’s decode this example step by step 👇
Step 1 — Importing Playwright Functions
import { test, expect } from '@playwright/test';
Here:
test()→ used to create a testexpect()→ used to verify whether something is working correctly or not
Think of expect like: In real life how we expect things to be that's how expect works here.
Step 2 — Creating a Test
test('has title', async ({ page }) => {
this creates a test named "has title".
And this page object is super important 👀
page basically represents the browser tab.
Using it, Playwright can:
open websites
click buttons
type into inputs
navigate pages
and interact like a real user
Step 3 — Opening a Website
await page.goto('https://playwright.dev/');
This line simply opens the Playwright website in the browser 🌐
Step 4 — Assertion (Checking Something)
await expect(page).toHaveTitle(/Playwright/);
This is called an assertion.
Here Playwright checks whether the page title contains the word "Playwright" or not.
If yes ✅ → test passes
If no ❌ → test fails
Understanding the Workflow
I know it might feel overweling, seeing a lot of new tings at first , but playwright is comparatively easy, Now install a vs code extension named - playwright test for vs code by microsoft.
Before jumping into recording tests and writing automation scripts, let's understand the actual Playwright workflow.
One thing I really liked about Playwright is that it gives you multiple ways to work with it 👀
You can either:
use the VS Code extension/tools 🧩
or do everything directly from the command line 💻
I personally started with the VS Code Playwright extension because it makes things way easier for beginners. You get:
test explorer
run buttons
browser controls
debugging tools
trace viewer
and many other powerful features directly inside VS Code 🚀
But the cool part is — behind the scenes, all of these tools are basically running Playwright commands for you.
For example:
running tests
debugging
opening UI mode
generating tests
Everything can also be done manually through the terminal.
So while the VS Code tools make the experience smoother, understanding the command-line workflow is equally important because that’s how Playwright is usually used in real projects and CI/CD pipelines.
Recording Tests 🌀
This was honestly one of the coolest parts of Playwright for me 😄
Instead of manually writing every single line of automation code, Playwright can actually watch your actions inside the browser and generate the test code automatically.
Yes… literally 😵💫
You open a browser, click buttons, type into inputs, navigate pages - and Playwright keeps generating the code in real time.
This feature is called Codegen.
You can start it using the command line:
npx playwright codegen
Or directly from the VS Code Playwright tools 🧩
Once it starts, a browser window opens and starts recording your actions.
For example:
login to a website
search for a product
click buttons
fill forms
submit data
And Playwright converts all those actions into actual automation scripts automatically 🚀
Something like this:
await page.goto('https://example.com');
await page.getByRole('textbox').fill('Abhi');
await page.getByRole('button', { name: 'Login' }).click();
This helped me understand the workflow way faster because instead of thinking:
“What code should I write?”
I could first perform the action manually and then observe how Playwright writes the code behind the scenes 👀
One more cool thing I noticed: Playwright also tries to generate smart locators automatically instead of giving random messy selectors all the time.
And honestly, Codegen is one of the fastest ways for beginners to start learning Playwright without feeling overwhelmed.
These are the tolls that will help you to pick locator, assert visibility, assert text, assert value.

Understanding Locators 📍
Now here comes one of the most important concepts in Playwright - Locators.
In simple words, locators help Playwright find elements on the page.
Because think about it 🤔 If Playwright wants to click a button or type inside an input field, it first needs to know:
“Which exact element should I interact with?”
That’s where locators come in.
For example:
await page.getByRole('button', { name: 'Login' }).click();
Here Playwright finds the Login button and clicks it.
Common Locators You’ll Use 👇
By Role
page.getByRole('button', { name: 'Submit' })
This is one of the best and most reliable ways because it works similar to how real users and screen readers interact with the page.
By Text
page.getByText('Welcome')
Finds elements using visible text.
By Label
page.getByLabel('Email')
Super useful for forms and input fields.
By Placeholder
page.getByPlaceholder('Enter password')
Targets input placeholders directly.
By Test ID
page.getByTestId('login-btn')
Very commonly used in real-world projects because it stays stable even if UI changes.
Why Locators Matter So Much ⚡
Bad locators = flaky tests 💀
If your locator is weak or unstable, your tests may randomly fail after small UI updates.
That’s why Playwright recommends using:
roles
labels
text
test ids
instead of complicated CSS selectors whenever possible.
And honestly, once you understand locators properly, writing Playwright tests becomes way easier 🚀
Assertions ✨
So far we learned how to:
open a website
click buttons
fill forms
interact with elements
But here’s the real question 👀
How do we actually verify that things are working correctly?
That’s where Assertions come in.
Assertions are basically checks that confirm whether the expected result happened or not.
For example:
Did the login succeed?
Is the heading visible?
Did the page redirect correctly?
Is the error message showing?
Did the cart update?
Without assertions, Playwright would just perform actions blindly without verifying anything.
Example of an Assertion 👇
await expect(page).toHaveTitle(/Playwright/);
Here Playwright checks whether the page title contains "Playwright" or not.
If yes ✅ → test passes If no ❌ → test fails
Some Common Assertions
Check Visibility
await expect(page.getByText('Welcome')).toBeVisible();
Checks whether an element is visible on the page.
Check Text
await expect(page.getByRole('heading')).toHaveText('Dashboard');
Verifies exact text content.
Check URL
await expect(page).toHaveURL('https://example.com/dashboard');
Checks whether the current URL is correct.
Check Input Value
await expect(page.getByLabel('Email')).toHaveValue('abhi@gmail.com');
Useful for forms and input validation.
Debugging & Interactive Mode 🐞
While working with Playwright , Your tests will fail sometimes.
And honestly, that’s normal.
Sometimes the locator breaks, sometimes the page loads slowly, sometimes the element is not found… and this is exactly where Playwright’s debugging tools become super useful 🚀Interactive UI Mode 👨💻
Playwright comes with an amazing Interactive UI Mode that lets you visually run and inspect your tests.
You can start it using:
npx playwright test --uiOnce it opens, you can:
run tests visually
see each test step
inspect failures
watch browser actions live
replay tests
debug easily
Honestly, this made learning Playwright way easier for me because I could literally see what was happening instead of guessing blindly 😭
Final Thoughts 🌻
Honestly, there’s still a lot more to explore in Playwright.
Things like:
CI/CD integration
advanced debugging
reporting
and scaling large test suites
This blog was just a beginner-friendly guide to help you get started without feeling overwhelmed.
And trust me, Playwright looks scary only in the beginning 😄 Once you understand the workflow, things start making sense pretty quickly.
My biggest advice would be: Don’t try to memorize everything.
Instead:
run tests
break things
debug errors
experiment with locators
and build small real-world flows
That’s honestly the fastest way to learn.
I learned most of this in around 6 hours just by trying things myself, getting confused, reading docs, watching videos, and asking questions constantly 😂
So if you’re someone who was avoiding Playwright because it sounded complicated… hopefully now it feels a little less scary 👨💻
Happy Testing 🌻