
Hi, I'm Abhi. I write articles - real ones, not AI slop. Human written, human friendly & for humans.
So I'm a full-stack dev ( MERN / PERN ). React, Express, Node, that's my comfort zone. But recently I started learning Angular, and routing in Angular is a whole different game. Some things are surprisingly nice, some things made me go "why is this so complicated?"
So instead of just learning and forgetting, I thought why not write about it? If you're also a React dev exploring Angular for the first time, this one's for you.
Stay tuned and have a look at the sections below.
What’s in this Article !
How Routing Works in Angular (the mental model,
RouterModule,app-routing.module)Basic Routing Example
Lazy Loading (brief intro)
Before starting, I would like to mention - I am not an expert in Angular. I just started exploring it and I'm sharing my knowledge here. So you get to see a React guy's POV while learning Angular sideways.
How Routing works in Angular.
So unlike React - where we have to install npm packages and use React Router or TanStack Router for routing, because React doesn't have routing on its own - in Angular it's totally different. It provides a prebuilt routing architecture that we can use while building projects, and this is what they use in production grade products too.
This is called the Angular Router ( @angular/router ). It comes built-in when you create a project using the Angular CLI.
We don’t have to do npm install, or any third party package, nothing. Just create a project and start routing.
So how to use this? Since i’m using Angular 22 , so we are going to stick to this, we'll be using the standalone approach. If you see older tutorials using RouterModule.forRoot() and app-routing.module.ts , that's the old way. We are not doing that here.
Now before jumping into code, let me quickly explain the key pieces you need to know:
Routes
This is just an array where you define which path should load which component. If you've used React Router, think of it like your route config array. Something like { path: 'about', component: AboutComponent }.
ProvideRouter()
This is how you register your routes in app.config.ts. You pass your routes array inside this function and Angular takes care of the rest.
This is the placeholder in your HTML where the matched component will render. If you know React Router, this is basically <Outlet />. You put this in your app.component.html and Angular will swap components in and out of this spot based on the URL.
routerLink
This is Angular's version of <Link to="/" /> from React Router. Instead of using <a href=""> (which will reload the whole page), you use routerLink for client-side navigation. Looks like this: <a routerLink="/about">About</a>.
That's it. These four things are all you need to set up basic routing in Angular. If you already know React Router, here's a quick cheat sheet:
Basic Routing Example
So , now it’s time to build something. Now we are going to build an Angular app with 4/5 pages.
Follow the steps below:
Step - 1 :
Create a new Angular app.
ng new angular-routing
It will ask you few questions, mae sure to click yes while setting up a new app.
Step - 2 :
Generate the Components
ng g c about
ng g c contact
ng g c home
ng g c pricing
After this your folder structure should look somethig like this-
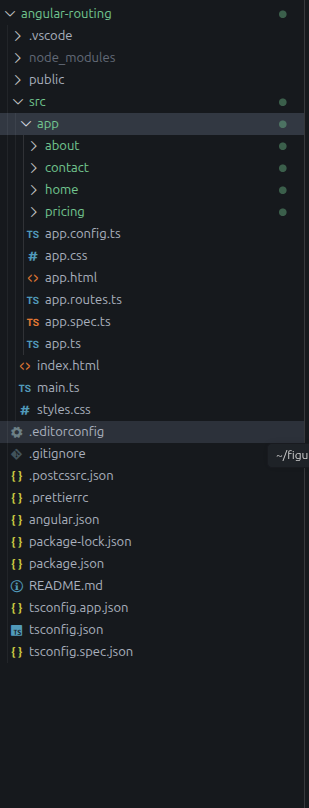
You can add some basic text in those components tempalte files. So that you can identify the pages easily.
Step - 3 :
Now it’s time to define the routes.
In the app folder, you can see a file named as - app.route.ts
Open this file and initially it shold look like this -
import { Routes } from '@angular/router';

export const routes: Routes = [];
now we are going to write the routing of our project here .
For this- you need to import all components and add them inside the array. this should look like this -
import { Routes } from '@angular/router';
import { About } from './about/about';
import { Contact } from './contact/contact';
import { Home } from './home/home';
import { Pricing } from './pricing/pricing';

export const routes: Routes = [
{path:'', component: Home},
{path:'about', component: About},
{path:'contact', component: Contact},
{path:'pricing', component: Pricing},
{ path: '**', component: NotFound }
];
If you've used React Router, this is basically your route config array.
That ** refers to wildcard routes, you can obviously create a not-found page and assign it there .
Step - 4 :
Now it’s tme to register the routes.
Open the app.config.ts file and here we need to register the routes in our app.
import { ApplicationConfig, provideBrowserGlobalErrorListeners } from '@angular/core';
import { provideRouter } from '@angular/router';

import { routes } from './app.routes';

export const appConfig: ApplicationConfig = {
providers: [
provideBrowserGlobalErrorListeners(),
provideRouter(routes)
]
};
You might have to do this manually or there are high chances it is already done for you, depends on how you configured your app.
Now your entire app has the context of your routing. Now it’s time to use it.
Step - 5 :
Now it’s time to add and navigation links. Open the app.ts file and write this -
import { Component, signal } from '@angular/core';
import { RouterOutlet, RouterLink } from '@angular/router';

@Component({
selector: 'app-root',
imports: [RouterOutlet, RouterLink],
templateUrl: './app.html',
styleUrl: './app.css'
})
export class App {
protected readonly title = signal('angular-routing');
}
Important thing to notice here is - In React we don’t need to do this, but in Angular, standalone components need to explicitly declare what they use. Took me a while to get used to this.
Now open the app.html file which is the main template file and write this -
<nav>
<a routerLink="/">Home</a>
<a routerLink="/about">About</a>
<a routerLink="/contact">Contact</a>
</nav>

<router-outlet></router-outlet>
We are basically creating a navbar here and providing the context for routing here.
If you want you can create separate navbar and use that here. I”m doing this to keep things easy and minimal.
Lazy Loading.
For a small app, this is no big deal. But imagine you are working on a production grade product and you have 50 pages.
But your user just want to see the Home page, but their browser is downloading all 50 pages. Obviously this is not the optimised way to handle things.
Now this is where Lazy Loading comes to the game. It only loads a page’s code when the user actually navigate to it. Not before it.
In React this is the same concept but the difference is only how we implement this concept.
As we discussed earlier how to define routes -
import { AboutComponent } from './pages/about/about.component';

{ path: 'about', component: AboutComponent }
This is where we add lazy loading concept. Now if you want this page to lazily load then you have to do this -
{
path: 'about',
loadComponent: () => import('./pages/about/about.component')
.then(m => m.AboutComponent)
}
Important thing to remember - you don’t have to import it at the top.
Now about component will only load when someone actually clicks on it or navigates to it.
So yeah, that's it for Part 1. We covered how routing works in Angular, set up a basic routing example from scratch, and looked at lazy loading. If you made it this far, you know enough to start building stuff with Angular routing.
In Part 2 we’ll learn about :
Route Parameters & Query Params
Nested / Child Routes
Route Guards
If you found this helpful, share it with your dev friends who are still stuck in the React bubble. And follow me so you don’t miss part 2 .
Happy Coding🌻